The brief:
The idea behind this assignment is to incorporate the insights you have learned so far on the course into a set of photographs directed towards one type of subject. You should 10 – 15 photographs, all of a similar subject, which between them will show the following effects:
- single point dominating the composition
- two points
- several points in a deliberate shape
- a combination of vertical and horizontal lines
- diagonals
- curves
- distinct, even if irregular, shapes
- at least two kinds of implied triangle
- rhythm
- pattern
Choose from these groups of subjects:
- flowers and plants
- landscapes
- street details
- the raw materials of food
- if you prefer, choose your own subject.
Having had a couple of false starts to this assignment, I decided to choose the raw materials of food. Details of my planning can be seen on my Assignment 2 – Planning posting. As mentioned there, I have looked at the following photographers for my inspiration:
- David Loftus
- Beatrice Peltre
- Carl Warner
- Keiko Oikawa
- Mittongtare Studio
- Jean Cazals
- Anders Schonnemann
- Clara Gonzalez
- Alexandra Grablewski
- Mythja
- Clare Barbosa
I found that I was really inspired by the fresh, airy feel that many of the photographers had in their images – very much like a bright summer’s day. I was also intrigued by some of the dark, moody photographs that were more gritty in nature. I learnt from researching these photographers that most photographs are taken from a 45 degree angle, face on and level with the food, or from overhead. With that in mind, I decided, as a theme, I would shoot raw food using natural light only and try to keep props to natural elements as far as possible. I also wanted to reflect arrangements that looked natural. My only lighting equipment that I used were white foamboard bounce cards, three black foamboards and a diffuser and some crumpled tinfoil. I used a tripod for most of my shots, with the exception of the overhead ones, where I climbed onto a ladder and hand held the camera. All post processing was done in Lightroom 5.
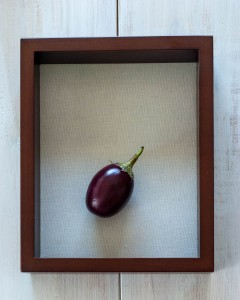
My inspiration for this photo (fig 01) was drawn from an image I had seen where an old packing crate was stood up against a shed’s wall with one shoot of asparagus propped up inside. I wanted the Indian eggplant to be given prominence, so placed it in a shadow box frame. I believe that even though there is an extra element in the frame, namely the picture frame, this still qualifies as a single point, because the eye is immediately drawn to the vegetable. The fact that the eggplant is contained within the frame also fools the eye into thinking that it is one element. My light was coming from two windows – from the left of frame (8 o’clock position) and from the top of frame (12 o’clock position). I took this shot from the top of the ladder, however I don’t think I was not sufficiently centred over the frame as there is a slight angle at the top of the frame, even after I straightened out the vertical and horizontals in post processing. I wanted everything sharp for the overhead shot, so used an aperture of f8. Post processing involved boosting the contrast a little, bumping up the shadows, clarity and adding a touch of vibrance. I also set the white and black points.
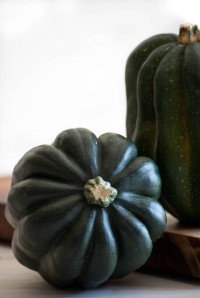
I liked the play of light around the ridges of these acorn squashes (fig 02) and played around to get an optimum composition. I elected to put on squash lying flat facing the camera and the other on a cutting board upright to create a bit of height in the image. I purposely did not include the whole upright squash to create a more asymmetrical balance. Both stalks on the squash form visual points to lead the eye forward and back. I used my tripod and remote shutter release as I was shooting a a slow shutter speed. The light source was from camera right (3 o’clock position) and camera left (11 o’clock position). A little light was blocked by standing my husband in front of the door as the ridges on the left hand squash were blowing highlights. Post processing involved boosting the contrast and clarity to make the image pop. I also decreased the shadows so that the ridges of the squash would be enhanced. I then made sure that my white background was uniformly white, dodging where necessary.
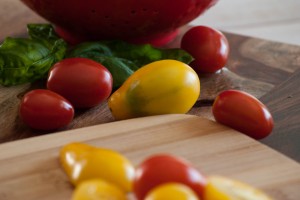
In figure 03 I focused on the heirloom tomatoes in the background as I liked the close contrast with the red colander and green basil. I have attempted to create a few planes in this photograph as there are three surfaces visible as well as differing heights of the fruit, herbs and utensil. Both red tomatoes on either side of the yellow tomato form triangles together with the yellow tomato which is the apex of both triangles. Again my camera was on a tripod and I used the remote shutter release. The light source was from camera right (4 o’clock position) and camera left (11 o’clock position). Post processing only involved boosting contrast and clarity minimally as the colours are nicely saturated and there are sufficient highlights in the image and minimal shadows.
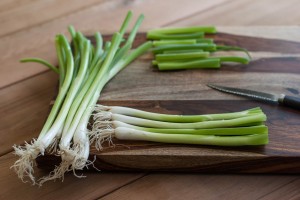
I arranged a bunch of spring onions (fig 04) in vertical orientation with their roots facing the camera as I liked the tangled detail that the roots present. I then put a similar bunch in horizontal orientation, but that didn’t look quite right, so I then spread the onions out, lining them up neatly and sliced off their ends, placing those at the far end of the cutting board and placed a knife down as if I had been interrupted in the middle of the task of chopping vegetables. I used a shallow depth of field here so that the ends of the vertical onions and the chopped bits and knife would be blurred slightly. This brings the eye back down to the front of the image again. The diagonal lines of the table top also lead the eye in to the vertical arrangement. The light source was from camera right (3 o’clock position) and camera left (11 o’clock position). Post processing involved boosting the contrast, bringing down the highlights a tad, lifting the shadows and boosting the clarity. Again tripod and shutter release were used.
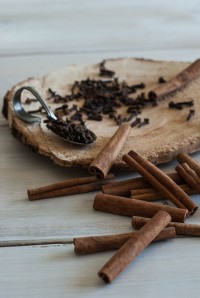
For my diagonals image (fig 05), I placed a round cut from a tree trunk as my plane, then simply dropped cinnamon sticks from a low height in front of it and left them where they fell. They had all fallen in a diagonal orientation. I then took a handful of cloves and let them fall onto the tree trunk and finally I used an old chef’s tasting spoon to scoop up a spoonful of the cloves and placed that on the tree trunk in a diagonal orientation as well. All the elements in the photo (except the tree trunk) are diagonally oriented. I wanted to blur out the background a little, but not too much, otherwise the cloves would just be one black mass and they would lose their identity, so I used an aperture of f5.6 which gave sufficient blur in the rear of the image to keep the focus on the spices in the front. I shot this image at differing angles (overhead and from the front low down, but this angle best suited the display of the diagonals. The light source was from camera right (3 o’clock position) and camera left (11 o’clock position). Post processing involved boosting contrast, shadows and clarity and a little vibrance was also added. Tripod and shutter release were used.
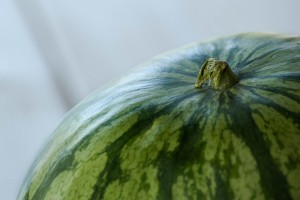
I wanted to emphasize the rounded shape of this little watermelon (fig 06), so chose to shoot only a portion of it filling the frame. With my camera on the tripod and using the remote shutter release I aimed downwards so that I could include the diagonal lines of the table to contrast against the curve of the watermelon. The watermelon was backlit by the window, with sunlight pouring in. In post processing I cropped the image a bit to exclude part of the table, boosted contrast, brought down the highlights and shadows, added clarity and vibrance.
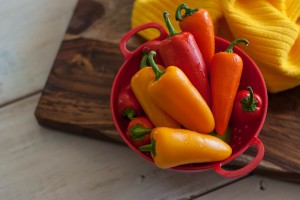
Mini peppers (fig 07) have a very distinctive shape (almost conical) and as I had a whole bag of them I decided to put some of them in my little red colander to enhance the colour contrast between the orange, yellow and red peppers. The diagonally oriented peppers create a good design contrast contained in the round container. I threw a bright yellow tea towel next to the colander to offset the orange peppers. I placed the colander so that it was overhanging on the cutting board to create more visual interest. Then it was up the ladder for me again to get an overhead shot, handheld. The light source was mainly from camera right (3 o’clock) and camera left (11 o’clock position). I brought up the exposure by a third in post processing, boosted the contrast and highlights, opened up the shadows quite a bit and added clarity and vibrance.
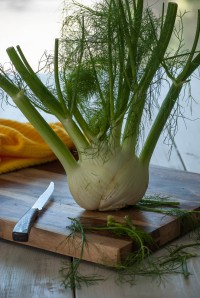
There is probably not another vegetable that has such a distinct shape as fennel (fig 08). It is hard to describe its shape – possibly fan shaped? To show off the feathery fronds, I chose to backlight the vegetable by placing it on a cutting board in front of the windows. I then tossed a yellow cloth behind it to add some depth and contrast to the image. I then chopped off a few fronds and dropped them in front of the vegetable, letting them spill over onto the table and finally I placed a knife on the cutting board. I used a tripod and remote shutter release. In post processing I lowered the highlights a fraction and opened up the shadows quite a bit. I then added clarity and some vibrance.
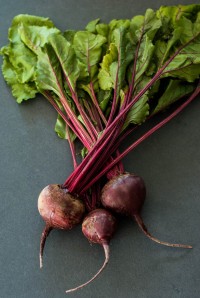
For this overhead shot (fig 09) I arranged three beetroots to form an implied inverted triangle, overlapping their stalks to form complementary lines, the apex of the triangle being the centre beetroot. I placed them on a black slate tile in order to contrast their bright colours. The light sources were at camera left (9 o’clock position) and from the top of frame (12 o’clock position). I also placed a black foam board at camera right to darken the right side of the frame slightly. I boosted the contrast in post processing, brought the highlights down quite a bit, set white and black points, and boosted the clarity and added a touch of vibrance.
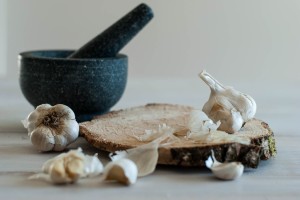
I shot this photograph (fig 10) fairly low, on a tripod using my remote shutter release. I, once again, used my tree trunk platter and placed a garlic bulb on it, first scrunching the garlic so that the skin would come loose and which fell in front of the bulb. I then placed another bulb with its roots toward the camera and broke a few cloves loose from another bulb and scattered them in front of the platter. To create some height in the image I placed a mortar and pestle behind the platter. The pestle and two garlic bulbs form an isoceles triangle with the apex of the triangle being the tip of the pestle. I then focused on the garlic bulb on the right. The front cloves were blurred slightly to draw more attention to the implied triangle. The light source was from camera right (3 o’clock position) and camera left (11 o’clock position). In post processing I boosted the contrast, lifted the highlights and shadows a bit, set the black and white points and added clarity.
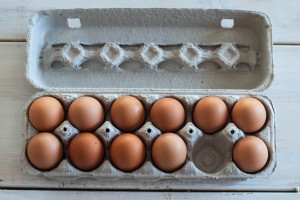
I think this is the image (fig 11) that I struggled most with. While I get the concept of rhythm, it is not so easy to translate it in an uncontrived manner using food. I lined up all sorts of food, bumping an item out of sync, but that simply did not work for me, even slicing them and arranging them on a cutting board, but then realised I was probably overthinking the whole thing. I took a carton of eggs out of the fridge and removed an egg. Standing on the ladder again, I filled the frame with the egg carton. The rhythm is broken when the eye comes to rest on the empty slot and then continues to the two final eggs. The light sources were from camera right (3 o’clock position) and from camera left (11 o’clock position). I bumped the exposure up by a two-thirds stop in post processing, added some contrast, and lifted the shadows very slightly and added a bit of clarity.
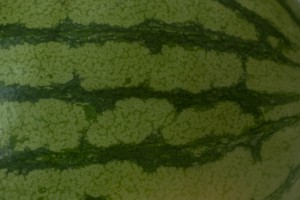
I noticed the irregular pattern on the skin of this small seedless watermelon (fig 12) which draws the eye across the frame, so with my camera on the tripod and using the remote shutter release I filled the frame with the pattern. The light source was from camera left. I made a small crop in post processing, boosted the contrast, added some highlights, lifted the shadows and added vibrance and clarity.
As it is stated in the course manual at the beginning of Elements of Design, colour can be a distraction when working on these design elements. I have, therefore, created a set of black and white versions of the photographs above, (some extra processing was needed in the way of tonal adjustments to each image) for comparison purposes in order to see what the effect would be like in monochrome. For ease of viewing I have put these into a slideshow. It is obvious that those photographs where texture is more prevalent, for example, the two points and the implied triangle of the beetroot images, work well in black and white.
Discard Images
My discard images can be seen in my Flickr Food Photography album.
ASSESSMENT CRITERIA
Demonstration of technical and visual skills (materials, techniques, observational skills, visual awareness, design and compositional skills)
I used two lenses for this assignment, namely a 50mm f1.8 and a 55-200mm f4-5.6. Having the camera on the tripod for the most part forced me to check the edges of my frame for any distractions and edges of equipment like foamboard creeping into the shot. I took my time with this assignment as I was limited to the hours when the sun would come into the room so I did not rush it at all. I took my tutor’s advice from the feedback on Assignment 1 and studied Laura Letinsky’s work and I hope I have taken some of the pointers that he made on board in this assignment. I feel my observational skills have definitely improved as I am definitely more aware of the direction of the light and have tried to use that to bring out highlights and shadows in my images. I feel that my still-life compositional skills have definitely improved as well.
Quality of Outcome (content, application of knowledge, presentation of work in a coherent manner, discernment, conceptualisation of thoughts, communication of ideas)
My blog is coming along nicely. I am enjoying the process and I believe that it is laid out well and is easy to navigate. I have applied all knowledge learnt up to now in this assignment to the best of my ability, having never attempted a subject like food photography before. My aim was to convey raw food in natural light in as natural setting as possible and I believe I have succeeded in that. Although I don’t really like still life/product photography, I really enjoyed this assignment and will probably dabble again. I also have so much more appreciation for all the food photographers out there. It is not an easy task. I have brushed up on my Lightroom skills a bit and have been able to better fine tune my images in post processing than before and I believe the quality can attest to this.
Demonstration of Creativity (imagination, experimentation, invention, development of a personal voice)
Having never done any food photography (the odd snap of someone’s meal in a restaurant not being taken into account) this was quite a challenging assignment for me. I spent a lot of time researching various food photographers and inspecting their images closely. Notwithstanding I tried to come up with some different items to include in my photographs in the way of natural elements for some of my props. I do feel that the collection of photographs in this image are part of an individual style.
Context (reflection, research, critical thinking)
I am now comfortable with my learning blog and find that I use it more than my physical notebook. I still need to work on keeping the notebook with me. I have downloaded Menderley, a PDF/bookmark manager, that Stephanie dh recommended in the Flickr Content and Narrative discussion forum and I find that this has helped me organize my life a bit better. I have been to two exhibitions: Faces of Humanity: in black and white – An Exhibition by David Bong and Gu Xiong: a journey exposed and reviewed both of them. My review on David Bong was read by his office and I was contacted and thanked for my accurate review. Needless to say, that made me feel pretty good. I have watched the following videos to help me with this assignment: Sebastião Salgado: The silent drama of photography; An Interview with Laura Letinksky; Food Photography Without Expensive Gear – Chris Marquardt; Story on a Plate: Food Photography & Styling, as well as a video about Jacques-Henri Lartique. Because I was not able to get to too many galleries this summer, I reviewed the Russian photographer, Elena Chernyshova’s series, Days of Night/Nights of Day. My write up was quite long and I couldn’t link to any of her images (they were in a slide show) so I contacted her asking her permission to use one of her images on my blog. She was extremely pleased that I had asked and gave me permission to use some of her images, which I have done, with the necessary credit to her and explanation of my usage. I reviewed Stephen Shore’s The Nature of Photographs, and also John Berger’s Understanding a Photograph. Most of the research articles I found about food photography did not really help me much. They were more geared towards tricks of the food stylist, historical/political trends in food styling, some really complicated techniques such as food stacking and levitating food, a project someone had done on rotten food, the revamp of Bon Appetit magazine, the need to share your meal on social networks, and the role of the food stylist. All extremely interesting reads, but not quite what I was looking for. Nevertheless, some snippets were helpful. Going forward I plan to attend more exhibitions and get through this pile of books that is on my desk waiting to be read.
Bibliography
Barboza, Clare. (2014) Clare Barboza Photography [online]. Available from http://clarebarboza.com/ [Accessed 27 July, 2014]
Carafoli, J. F. (2003). Tempting the Palate: The Food Stylist’s Art. Gastronomica, 3(2), 94–97.
Dunea, M. (2014). Food for Photography. Nielsen Business Media, 12.
Feliciano, K. (2009). Raw Food Photography. Photo District News, 29(2), 24–26, 28.
Fredrickson, L. (2012). Food Pairings. Popular Photography, 76(1), 24–25.
Fredrickson, L. (2013). Plated Waste. Popular Photography, 77(2), 20–21.
Freeman, Michael (2007). The Photographer’s Eye: Composition and design for Better Digital Photos, The Ilex Press. Lewes, England.
Grablewski, Alexandra. (2014) Alexandra Grablewski Photography [online]. Available from http://www.agrablewski.com/ [Accessed 29 July, 2014]
Goldwasser, A. (1998). Fashion plate. I D, 45(6), 58–59.
Kelby, Scott (2014). The Adobe Photoshop Lightroom 5 book for digital photographers, New Riders.
Kolonia, P. (2013). Thought for Food. Popular Photography, 77(10), 54–59.
Loftus, David. (2014) David Loftus [online]. Available from http://www.davidloftus.com/food [Accessed 28 July, 2014]
Margolis, L. (2013). Back to Basics: Food Photography Lighting & Styling. PhotoShelter Blog. Available from: http://blog.photoshelter.com/2013/05/back-to-basics-food-photography-lighting-styling/ [Accessed 29 July, 2014]
Matalon-degni, F. (2010). Trends in Food Photography. Gastronomica, 10(3), 70–83.
Milano, D. (n.d.). 10 Tips for Mouth Watering Food Photography. Digital Photography School. Retrieved August 14, 2014, from http://digital-photography-school.com/10-tips-for-mouth-watering-food-photography/ [Accessed 29 July, 2014]
Mittongtare, Pornchai. (2014) Mittongtare Studio [online]. Available from http://www.mittongtarestudio.com/ [Accessed 28 July, 2014]
Mythja (2014). Mythja Photography [online]. Available from http://mythja.com/ [Accessed 29 July, 2014]
Oikawa, Keiko. (2014) Keiko Oikawa Photography [online]. Available from http://www.keikooikawa.com/ [Accessed 28 July, 2014]
Peltre, Beatrice. (2014) Beatrice Peltre Food Styling & Photography [online]. Available from http://www.beatricepeltre.com/ [Accessed 28 July, 2014]
Ramelli, Serge. (2014) The Art of Black and White Yesterday and Today! [online] available from http://photoserge.com/tutorial/the-art-of-black-white-yesterday-and-today/ (accessed 11 August, 2014)
Schonnemann, Anders. (2014) Anders Schonnemann Photography [online]. Available from http://www.schonnemann.dk/ [Accessed 29, July, 2014]
Warner, Carl. (2014). Carl Warner [online]. Available from http://www.carlwarner.com/foodscapes/ [Accessed 28 July, 2014]
Workshop, Todd Porter and Diane Cu-Porter – Story on a Plate: Food Photography & Styling [webcast, online] Creative Live, Seattle, USA, June 2014. 32 minutes: 48 seconds. https://www.creativelive.com/courses/story-plate-food-photography-styling-todd-porter-and-diane-cu (accessed 27 July, 2014)

